Category: Cheat Codes

Step aboard the ultimate guide to Shadow Gambit: The Cursed Crew!
Inside, you’ll uncover a complete story recap, detailed control layouts, optimal crew builds, and a full walkthrough for every sandbox island. We’ve packed in hidden secrets, boss battle tactics, difficulty breakdowns, the latest patch updates, badge challenge tips, and powerful crew synergy strategies—everything you need to lead your cursed pirates to victory across the treacherous Lost Caribbean.

Table of Contents

  1. Basics
  2. Story & Setting
  3. Controls & UI
  4. Crew Recruitment & Builds
  5. Islands & Objectives
  6. Walkthrough TOC
  7. Full Walkthrough
  8. Secrets & Side Missions
  9. Boss Strategies
  10. Tips & Tricks
  11. Difficulty & Badges
  12. Patch Updates & QoL
  13. Easter Eggs & Secret Areas
  14. Effective Crew Synergies
  15. Conclusion

1- Basics

Shadow-Gambit-The-Cursed-Crew-start

Released in August 2023, Shadow Gambit: The Cursed Crew is a real-time tactics stealth adventure from Mimimi Games, published by Hooded Horse. Available on PC (Steam & GOG), PS5, and Xbox Series X/S, it invites players to explore handcrafted sandbox islands, wield supernatural pirate abilities, and master the unique Shadow Mode—pausing time to coordinate precise, synchronized actions across up to eight playable characters.

Note: The game targets 60 FPS on high settings with a dedicated GPU, thus, integrated Intel graphics are unsupported for smooth performance.

2- Story And Setting

Shadow-Gambit-The-Cursed-Crew

Set in an alternate Golden Age of Piracy, a witch’s curse has brought the dead back to life. As captain of the ghost ship Red Marley, you’ll assemble a crew of cursed pirates to steal sacred relics from the Inquisition and free the Lost Caribbean. Every crew member wields powers rooted in their personal history, blending supernatural flair with heartfelt tales of redemption, all across a series of non-linear, choice-driven missions.

3- Controls And UI

Shadow-Gambit-The-Cursed-Crew-gameplay

Input Action
Left Stick / WASD Move
Right Stick / Mouse Camera
R1 / E Activate Ability
R2 / Q Shadow Mode (Pause & Command)
L1 / Tab Swap Crew Member
L2 / Ctrl Crouch / Stealth
Options / Esc Menu / Quick Save

The HUD displays each pirate’s vigour bar, ability cooldowns, noise meter, and minimap patrol tags. Toggle view cones to highlight guard sightlines because it’s essential for planning multi-step takedowns.

4- Crew Recruitment And Builds

Shadow-Gambit-The-Cursed-Crew-gameplay3

Recruit up to eight undead pirates, each filling archetypes e.g. Assassin, Infiltrator, Saboteur, Support, or Escapist. Build around mission goals and sandbox layouts.

Name Ability Effect Role
Afia Shadow Dash Knockdown on exit Assassin
Pinkus Possession Control guards & access vaults Infiltrator
Suleidy Spore Distraction Create bushes Support
Gaëlle Cannon Launch Area knockback Saboteur
Mr. Mercury Soul Anchor Bypass walls Escapist
von Presswald Possess Guard Unlock gates Saboteur
Arimtrice Blade Throw Short-range blink Assassin
Toya of Iga Ninjutsu Stealth Shadow pool concealment Infiltrator

5- Islands & Objectives

Shadow-Gambit-The-Cursed-Crew-gameplay8

  1. Tutorial Isle – learn core mechanics
  2. Inquisition Fort – artifact theft
  3. Harbor Town – sabotage & escape
  4. Jungle Ruins – rescue side mission
  5. Cursed Harbor – boss battle vs. Admiral Marlowe

6- Walkthrough Table of Contents

  1. Tutorial Isle
  2. Inquisition Fort
  3. Harbor Town
  4. Jungle Ruins
  5. Cursed Harbor (Final Boss)

7- Full Walkthrough

Shadow-Gambit-The-Cursed-Crew-gameplay7

Tutorial Isle

Master the art of Shadow Mode—pause time, assign precise abilities to each crew member, and unleash perfectly synchronized takedowns. Experiment with combos like firing Gaëlle’s cannon to launch foes into position, then following up with Afia’s lightning-fast dash for devastating multi-target kills.

Inquisition Fort

  • Approach from the northern cliffs, crouching behind crates for cover.

  • Possess a sentry with von Presswald to unlock the hidden gate.

  • Sneak Afia through the tunnel, staying in shadows to avoid patrols.

  • Plant cursed charges on the armory; use Spore Distraction to lure enemies if needed.

  • Extract via the chapel portal — quick-save before entering.

Harbor Town

Sabotage the supply crates to weaken enemy resources, then lure guards into narrow alleys where AoE cannon blasts can deal maximum damage. Keep patrol routes tagged to monitor their movements and avoid calling in reinforcements.

Jungle Ruins

Rescue the stranded pirate to gain access to his powerful Soul Anchor ability, then use Blade Throw blinks to swiftly bypass traps positioned in chokepoints.

Cursed Harbor (Final Boss)

Stagger Admiral Marlowe’s flintlocks with perfectly timed Shadow Dashes, then follow up with a coordinated multi-crew Shadow Mode strike to deliver the finishing blow.

8- Secrets & Side Missions

Shadow-Gambit-The-Cursed-Crew-gameplay9

  • Golden Skeletons in each training deck reveal hidden hatches, so collect to unlock lore easter eggs.
  • Secret cave in Iron Bay: extinguish three torches (one on a guard) to access the challenge room, references to past Mimimi titles.
  • Interact multiple times with NPCs aboard Red Marley to hear secret voice lines.

9- Boss Strategies

Shadow-Gambit-The-Cursed-Crew-gameplay13

Against Vepar the Tidecaller, dodge the rising water pillars and use Cannon Launch to ricochet shots off walls, staggering and eliminating clustered enemies. For Admiral Marlowe, disrupt his flintlocks with a well-timed Shadow Dash, then finish him off with a Blade Throw executed in Shadow Mode. When facing the Witch Governor, first possess one of her guards to deactivate the magic barriers, clearing the way for your main assault.

10- Tips & Tricks

Shadow-Gambit-The-Cursed-Crew-gameplay16

Quick-save after every kill or before executing complex plans, taking advantage of unlimited Memory saves to experiment without risk. Time your movements to slip through enemy viewcones, avoiding unnecessary crouching that slows progress. Make use of environmental traps—push boulders or drop crates—for silent multi-kills. Rotate your crew selection each mission to balance vigour gains and unlock upgrades more quickly.

11- Difficulty & Badges

Shadow-Gambit-The-Cursed-Crew-gameplay12

11.1 Legend & Cursed Modes

Legend and Cursed difficulties increase both enemy numbers and patrol complexity. In Cursed mode, triggering alarms won’t instantly fail the mission, but resources are far more limited, pushing you to rely on trial-and-error tactics and precise execution.

11.2 Badge Challenges

Badge challenges showcase true mastery of the game—earn “Cry Some More” by killing Basito on Gran Alcázar, “Deadly Ascent” by completing climbs without taking damage, and “Bigger on the Inside” by gaining access to Marley’s Hold. Each badge demands precise use of both character abilities and environmental advantages.

12- Patch Updates & QoL

Shadow-Gambit-The-Cursed-Crew-start-menu

12.1 Hotfix & Big Patch Changes

Post-launch updates fixed save errors, cutscene glitches, and UI overlap issues. The Big Patch brought back classic camera controls from earlier Mimimi games, refined logbook key bindings, and resolved dynamic foliage bugs, resulting in improved stability and a smoother experience across all platforms.

12.2 Control & Camera Options

The new ‘Standard’ camera follow mode allows smooth panning and rotation with analog sticks, while the classic RTS control scheme resolves keybinding conflicts between Execute Shadow Mode and door interactions—perfect for players familiar with Shadow Tactics or Desperados III.

13- Easter Eggs & Secret Areas

Shadow-Gambit-The-Cursed-Crew-gameplay9

13.1 Golden Skeletons & Training Deck

Each crew’s training deck conceals a golden skeleton, and defeating them unlocks secret dialogues and hidden cutscenes that reference past Mimimi games. Once all skeletons are collected, Stella or Theresa will appear in the Soul Hatch for a special encounter.

13.2 Iron Bay Secret Cave

On Iron Bay, extinguish three torches—one of which is carried by a guard—in the correct sequence to reveal a hidden cave. Inside, you’ll find a challenge room packed with Easter eggs and subtle nods to the Shadow Tactics and Desperados series.

14- Effective Crew Synergies

Shadow-Gambit-The-Cursed-Crew-gameplay91

Pairing complementary abilities streamlines multi-guard takedowns:

  1. Afia + Toya: Blink into Time Freeze, then Katashiro for instant triple kills in Shadow Mode.
  2. Gaëlle + Afia: Launch a guard into range then dash through clusters for silent chain eliminations.
  3. Suleidy + Arimtrice: Wander Dust pulls guards into Blade Throw’s blink radius for stealth kills.
  4. Pinkus + von Presswald: Possess sentry to open gates, then Pinkus controls next guard for smooth infiltration.

15- Conclusion

Shadow Gambit rewards creativity, patience, and seamless teamwork. With this guide’s builds, walkthroughs, hidden secrets, and advanced tactics, you’ll be ready to conquer every sandbox island, earn every badge, and defeat every boss. Gather your cursed crew, adapt your strategies with post-patch updates, uncover elusive Easter eggs, and chart your course to victory across the Lost Caribbean.

Shadow-Gambit-The-Cursed-Crew-Stealth-Tactics-And-Walkthrough

How to Master Shadow Gambit: The Cursed Crew – Stealth Tactics & Walkthrough

Step aboard the ultimate guide to Shadow Gambit: The Cursed Crew!Inside, you’ll uncover a complete story recap, detailed control layouts, optimal crew builds, and a

READ MORE

Last Updated: August 2025
Genre: Visual Novel | Adult Comedy | Turn-Based Combat
Platform: Windows, macOS, Linux
Developer: SUCCUBUS ZONE
Tags: NSFW, Mature, Hentai, Parody, RPG, Satirical

What is FEMINIST METEORITE?

“In a future where men have vanished, only one primitive alpha male remains to seduce, survive, and save the human race…”. FEMINIST METEORITE is a comedic adult visual novel RPG set in a post-apocalyptic world where all men are wiped out by a mysterious meteorite. Humanity’s survival lies in a desperate experiment: the resurrection of a “genetically elite caveman” from a DNA capsule. This lone male must repopulate the Earth through turn-based combat seduction against powerful women leaders who now dominate the planet.

Key Features

  • NSFW Visual Novel with interactive story choices

  • Turn-Based Combat with special adult-themed skills

  • Animated CGs & Dialogue Scenes

  • Feminist Satire / Parody Plotline

  • Achievements, Saves, Language Options

Summary

Following a catastrophic meteorite strike, Earth becomes a matriarchal dystopia. A rogue scientist, driven by hope (and perhaps poor judgment), combines top-tier male DNA to form a single male specimen: YOU – a rugged, grunting caveman.

You’re thrown into a world ruled by tough, opinionated, and militant women—each wanting to assert control over humanity’s future.

Only by winning “intimate battles” and earning their trust (and submission), can you save the species.

Minimum System Requirements

Component Requirements
OS Windows 7/8/10 (64-bit) or MacOS
CPU Dual-core CPU (2GHz+)
RAM 2 GB
GPU Integrated Graphics
Storage 2 GB free space
DirectX Version 11

Gameplay & Mechanics

  • 🎭 Visual Novel Dialogues: Choose responses to build affection, dominance, or conflict.

  • ⚔️ Combat System: Each female opponent is a mini-boss. Use flirtation, dominance, and stamina strategically.

  • 🧬 Stats & Skills: Manage your testosterone, charisma, endurance, and “fertility levels.”

  • 🔓 Unlockable Scenes: Each victory leads to animated CGs with uncensored interactions.

FEMINIST METEORITE Full Walkthrough

Here’s a step-by-step progression guide:

🚩 Prologue: Birth of the Caveman

  • Cutscene introduction to the world and lore.

  • Learn basic controls and stats (Charisma, Libido, Strength).

  • Meet the rogue scientist and your first tutorial mission.

💃 Chapter 1: The Amazon Camp

  • Opponent: General Vira, a war-leader.

  • Strategy: Use Strength and Dominance to intimidate.

  • Tip: Use “Flex Muscles” and “Assert Primitive Rights” in the first 3 rounds.

  • Reward: Unlocked erotic CG and first badge.

💼 Chapter 2: Bureau of Feminist Order

  • Opponent: Dr. Sass, a scientist and politician.

  • Strategy: Charisma + Intelligence path.

  • Use “Flirt with Logic” and “Make Eye Contact” often.

  • Puzzle mini-game: Hack the hormone system.

  • Reward: Fertility Booster + scene unlock.

🏛️ Chapter 3: The Cathedral of Consent

  • Opponent: Priestess Sancta.

  • Strategy: Respect path (defensive style).

  • Use “Submit Respectfully” and “Praise the Matriarch”.

  • Boss fight includes a 3-phase morality test.

  • Reward: Unlock backstory + 2 NSFW animations.

⚔️ Final Chapter: Feminist Supreme Court

  • Boss: The Chief Justice, combines all combat styles.

  • Strategy: Hybrid build required. Use save/load method.

  • Ending branches:

    • ✨ Good Ending: Harmony and hybrid society.

    • 🔥 NSFW Ending: Global orgy, repopulation spree.

    • 💀 Bad Ending: Castration, become museum exhibit.


Tips & Tricks

  • Always max Charisma by mid-game to unlock alternate endings.

  • Defeated enemies become “allies with benefits” in your base.

  • Save before every boss fight.

  • Read tooltips on every skill—they often hide double-meaning abilities.


How to Download FEMINIST METEORITE

FEMINIST METEORITE Walkthrough

FEMINIST METEORITE – Game Overview, Walkthrough & How to Download

Last Updated: August 2025Genre: Visual Novel | Adult Comedy | Turn-Based CombatPlatform: Windows, macOS, LinuxDeveloper: SUCCUBUS ZONETags: NSFW, Mature, Hentai, Parody, RPG, Satirical What is

READ MORE

Bloodstained: Ritual of the Night throws you into a vast, demon-infested castle as Miriam, a Shardbinder cursed by a crystallizing affliction. Every hallway holds hidden secrets, every boss tests your reflexes and pattern recognition, and each Shard unlocks unique powers. This comprehensive guide will help you master the game’s controls, movement, combat mechanics, Shard system, crafting, and exploration. Discover essential map tips, boss battle strategies, and optimal build setups. Follow this step-by-step walkthrough to uncover all secrets, forge powerful gear, and dominate even Nightmare Mode.

Table of Contents

  • Game Overview
  • Controls & Movement
  • Core Mechanics
  • Exploration & Map Tips
  • Combat Techniques & Shards
  • Crafting & Alchemy
  • Boss Encounters & Strategies
  • Endgame, New Game+ & Secret Mode
  • Top Tips & Tricks
  • Conclusion

1. Game Overview

Bloodstained-Ritual-of-the-Night-Start-Menu

Bloodstained: Ritual of the Night, released in June 2019, is a gothic Metroidvania developed by ArtPlay and Inti Creates, led by genre legend Koji Igarashi. You take on the role of Miriam, a Shardbinder navigating Gebel’s ever-shifting demon-filled castle to stop a catastrophic alchemical ritual. Blending side-scrolling action with RPG-style leveling, a deep crafting system, and powerful Shard abilities, the game pays homage to classic Castlevania while forging a unique identity of its own.

  • Platforms: PC, PlayStation 4, Xbox One, Nintendo Switch
  • Genre: Action Metroidvania with RPG mechanics and rich exploration
  • Progression System: Defeat enemies to gain XP and level up, distribute stat boosts, equip up to three active Magic Shards and one passive Shard, craft and upgrade weapons, and unlock new areas with new powers
  • Game Modes: Single-player story campaign, New Game+, Boss Rush, 1986 Retro Mode, and various DLC challenges, including co-op dungeons and time trials.

Pro Tip: Passive Shards grant permanent toggle-on buffs at Rank 9, so prioritize leveling key passive Shards (Luck, Reflect, Speed) early to boost survivability in boss fights.

2. Controls & Movement

Bloodstained-Ritual-of-the-Night-Walkthrough-2

Responsive inputs are essential in Bloodstained: Ritual of the Night, where fast-paced combat and tight platforming demand precision. The default PlayStation controller layout is widely favored for its ergonomic balance and ease of access. However, if you’re using a keyboard or a different controller, it’s highly recommended to remap critical actions—like dodge and quick-cast Shards—to nearby, easily reachable keys. This minimizes reaction time and ensures smoother, more responsive gameplay in intense situations.

Action PS4 Button
Move Left Stick
Jump X
Attack
Backstep (Dodge) L1
Light Shard R1
Aimed Shard R2
Open Map/Menu Options (or Touchpad)

Movement Fundamentals

Bloodstained-Ritual-of-the-Night-Walkthrough-3

  • Backstep Dodge: Offers a brief window of invulnerability. Use it to dodge boss telegraphs and immediately counterattack during openings.
  • Double Jump: Gained from the Double Jump Shard, this is vital for navigating vertical areas and avoiding airborne enemies.
  • Slide Cancel: Executing a slide right after landing from a jump or dash cancels recovery frames, helping you maintain momentum and enabling smoother, faster movement.
  • No Native Angled Kick: Unlike some classic Metroidvanias, Bloodstained doesn’t feature a built-in downward kick. The Flashing Air Kick—a triple aerial strike—is a Technique unlocked by mastering the Kung Fu Shoes.

3. Core Mechanics

Bloodstained-Ritual-of-the-Night-Walkthrough-4

The replay value in Bloodstained: Ritual of the Night comes from its deep interconnected systems—Shard customization, Weapon Mastery, stat-based builds, and a robust crafting system. These mechanics work together to support a wide range of playstyles, encouraging experimentation and multiple runs. Below is a detailed breakdown of each core system, verified against the official Bloodstained Wiki for accuracy.

🔮 Shards

You can equip up to three active Shards and one passive Shard at a time.

  • Active Shards consume MP and gain experience, increasing in power as they rank up.
  • Passive Shards provide ongoing effects, and at Rank 9, they transform into toggleable buffs for greater flexibility.

🗡️ Weapon Mastery

Using weapons gradually fills their Mastery Bar.

  • Once you hit a threshold, you unlock Techniques—special moves triggered with directional or quarter-circle inputs plus attack.
  • These Techniques become available across all weapons of the same class, allowing for flexible combo potential.

📊 Stats & Leveling

Upon leveling up, Miriam’s base stats increase, but certain builds benefit more from specialized focus:

  • Vitality + Intelligence: Ideal for caster builds, boosting defense and magic damage.
  • Strength + Agility: Best for melee hybrids, enhancing physical attacks and speed.
  • Luck also influences drop rates and critical hits.

💾 Save Rooms & Portals

  • Save Rooms fully restore HP and MP—visit often before boss fights.
  • Warp Portals enable fast travel across the castle. Activating each one reduces backtracking and streamlines the exploration process.

4. Exploration & Map Tips

Bloodstained-Ritual-of-the-Night-Walkthrough-5

Efficient exploration in Bloodstained: Ritual of the Night is key to finding hidden loot, rare Shard Fragments, and secret areas. According to PC Gamer’s official guide, understanding the game’s iconography, chest color system, and backtracking tactics can drastically improve your progression.

🔍 Mini-Map Icons

  • White Outlines: Indicate fully explored rooms
  • Crimson Icons: Mark Bloodstained Save Rooms (HP/MP restore)
  • Teal Symbols: Represent warp portals for fast travel

🎁 Chest Colors & Contents

  • Brown: Common consumables (potions, food, etc.)
  • Red: Gold drops
  • Green: Equipment and weapons
  • Blue: Skill-gated items requiring movement-based Shards like Double Jump, Invert, or Reflector Ray

🧱 Breakable Walls

  • Look for cracked or oddly textured walls—striking them often reveals hidden passages packed with rare crafting materials, secret rooms, or shortcuts.

🚩 Map Markers & Backtracking

  • Use custom map flags to mark inaccessible areas.
  • Revisit these spots once you’ve unlocked key movement Shards such as:
    • Double Jump (vertical access)
    • Invert (gravity reversal)
    • Reflector Ray (teleporting through narrow spaces)
    • Burrow (dig through soft terrain)
  • These areas often hide exclusive rewards, secret bosses, or rare Shards.

Exploration Note: Blue-marked chests unlock only after obtaining the matching movement Shard (Double Jump, Climbing, etc.).  So, always revisit early regions after major skill unlocks.

5. Combat Techniques & Shards

Bloodstained-Ritual-of-the-Night-Walkthrough-6

Combat in Bloodstained: Ritual of the Night blends melee attacks, weapon Techniques, and Shard casting into a fluid, adaptable combat loop. Success depends on managing your MP, maintaining crowd control, and switching tactics based on enemy types and boss phases. The strategies below are built around optimizing this dynamic system:

🧿 Shard Casting

  • Light (R1) and Aimed (R2) Shards consume MP and are core to ranged damage and utility.
  • Leveling up Shards reduces MP cost, increases damage, and can unlock secondary effects like burn, poison, or slow.
  • Prioritize upgrading versatile Shards early for better MP efficiency in extended fights.

🗡️ Weapon Techniques

Mastering a weapon unlocks directional-input Techniques, turning basic attacks into powerful skills.
Key examples include:

  • Flashing Air Kick (Kung Fu Shoes): Multi-hit spinning aerial kick ideal for interrupting enemies mid-air.
  • Rapid Fire (Blunderbuss): Gatling-style burst that clears clustered enemies with ease.
  • Stun Edge (Shuriken): Fast, ranged attack with a high chance to stun smaller foes—great for interrupting spellcasters.

🎯 Enemy Priority & Crowd Control

  • Always target healers and magic users first—their support and AoE spells can quickly overwhelm.
  • Open with ranged Shards to pick off priority threats, then use AoE Techniques or sweeping melee attacks to thin out minions.
  • Save high-MP or burst Shards for elites and bosses once the battlefield is cleared.

Combat Note: Parry tough attacks with a well-timed Backstep (L1), then immediately counter with a high-damage Technique like Force Blast for maximum impact.

6. Crafting & Alchemy

Bloodstained-Ritual-of-the-Night-Walkthrough-7

Early in your journey, you’ll encounter Johannes, the castle’s resident alchemist. He provides access to crafting and upgrading systems, offering recipes for weapons, armor, consumables, and Shard enhancements.

  • Ingredients can be collected from enemy drops, treasure chests, or by dismantling unused equipment.
  • Dismantling gear returns 100% of the original materials at the cost of a small Alkahest fee, making it ideal for trying out different gear setups without waste.
  • This system encourages experimentation—mix and match weapons, upgrade your best Shards, and tailor your build to your preferred playstyle.

🛠️ Crafting Systems Breakdown

Crafting in Bloodstained: Ritual of the Night is both flexible and rewarding, allowing players to experiment freely with gear, consumables, and Shard upgrades. Below is a detailed look at each key mechanic:

📜 Recipes

  • New recipes are unlocked in Johannes’ shop after defeating major bosses.
  • Each recipe displays the required materials and the Alkahest cost for crafting.
  • Keep checking back—Johannes’ inventory expands as you progress.

🧩 Dismantling Gear

  • Dismantle unwanted weapons, armor, and accessories to recover all original materials.
  • The only cost is a small amount of Alkahest, making it ideal for testing rare blueprints without permanent investment.

🧃 Consumables

  • Craft meals, potions, and elixirs that temporarily or permanently boost stats like:
    • Strength, Vitality, Intelligence, Luck
    • HP and MP regeneration
  • Always stock up before entering boss fights or unexplored regions.

✴️ Shard Imbuing

  • Use Shard Fragments to increase the rank cap of specific Shards.
  • Higher ranks unlock stronger effects, new properties (e.g., status ailments, damage scaling), and sometimes toggleable buffs when fully upgraded.

Crafting Note: Dismantling items returns all crafting materials for a modest Alkahest cost, allowing you to experiment with rare blueprints without risk.

7. Boss Encounters & Strategies

Bloodstained-Ritual-of-the-Night-Walkthrough-8

Bosses test your mastery of movement, timing and build synergy. Equip passive Shards at Rank 9, bring top consumables and memorize patterns. The table below lists strategies and drops for key encounters

Boss Strategy Notable Drops
Vepar Dodge tidal waves, backstep post-slam, punish with Quick Strike Technique Shard: Blood Drinker; Vepar Trident
Zangetsu Parry overhead slashes, counter with Force Blast Zangetsu’s Sword; Shard: Moonlight Strike
Craftwork Slide under hammer swings, attack core after vertical smash Shard: Hammer Crush; Craftwork Trophy
Gremory Use summoned minions as bait, strike during phase shifts Gremory Armor Set; Shard: Soul Collector


8. Endgame, New Game+ & Secret Mode

Bloodstained-Ritual-of-the-Night-Walkthrough-9

Finishing the main story unlocks several new gameplay modes to extend your experience:

  • New Game+ – Start over with your existing gear, levels, and Shards for a more powerful second run.
  • Boss Rush Mode – Face a gauntlet of bosses back-to-back to test your skills and builds.
  • 1986 Mode – Despite common rumors, this retro throwback mode is activated by naming your New Game+ save file “1986”, not “NIGHTMARE.” It transforms the game with 8-bit-style visuals, audio, and UI, offering a nostalgic homage to classic Castlevania.

After completing the main story in Bloodstained: Ritual of the Night, several post-game modes and challenges become available, adding significant replay value:

🔄 New Game+

  • Start a new run while retaining all levels, gear, Shards, and Techniques.
  • Access previously unreachable areas, face hidden bosses, and push your build to new heights.

🕹️ 1986 Mode

  • To unlock this retro-style mode, name your New Game+ save file “1986”.
  • Features include pixelated graphics, chiptune soundtracks, and UI changes—a direct homage to classic Castlevania.

⚔️ Boss Rush Mode

  • Battle every boss in succession under time pressure.
  • Completing Boss Rush earns exclusive rewards, titles, and is ideal for testing advanced builds.

🧩 DLC Challenges

  • Includes additional dungeons, tougher enemy variants, and even online co-op modes.
  • Designed to extend replayability and offer new twists on core gameplay.

NG+ Callout: Remember to name your save file “1986” to experience the full retro throwback in 1986 Mode.

9. Top Tips & Tricks

Bloodstained-Ritual-of-the-Night-Walkthrough-10

These concise, expert-backed tips come from seasoned Bloodstained players and verified community sources:


🍀 Boost Luck

Each point in Luck increases your item drop rate, gold acquisition, and critical hit chance.
Before farming, equip accessories and gear that enhance Luck for maximum efficiency.


🌀 Backstep Cancel

Right after performing a Backstep Dodge, immediately crouch to cancel recovery frames.
This lets you chain dodges or attacks faster and reduces your vulnerability window.


📈 XP Farming Loop

The Den of Behemoths is ideal for high XP and rare gear farming.
Warp between nearby portals to quickly respawn enemies and create an efficient XP loop.


📚 Read Bookshelves

Technique tomes are hidden in library rooms throughout the castle.
Reading them adds the Technique to your journal—use it once to master it permanently, unlocking new moves.


🛡️ Gear Synergy over Stats

Instead of stacking random stat boosts, build around gear sets that support your playstyle.
For example:

  • Farming = +Luck + +Item Drop
  • Caster = +INT + MP Regen
  • Melee = +STR + Weapon Techniques

Conclusion

Bloodstained-Ritual-of-the-Night-Walkthrough-11

Bloodstained: Ritual of the Night is a game that rewards curiosity, build experimentation, and mastery of its deep combat and progression systems. With the verified controls, movement techniques, Shard optimization, and crafting strategies outlined in this guide, you’re fully equipped to shape Miriam into a force ready for any challenge.

Explore every corner, perfect your gear, and rise to the trials of Nightmare Mode with confidence.

Now—return to the castle and uncover every hidden power it holds.

bloodstained walkthrough

Bloodstained: Ritual of the Night Walkthrough

Bloodstained: Ritual of the Night throws you into a vast, demon-infested castle as Miriam, a Shardbinder cursed by a crystallizing affliction. Every hallway holds hidden

READ MORE

Welcome to the ultimate guide to Tinkerlands—a stunning top-down survival sandbox RPG that blends cozy crafting with intense survival strategy. Whether you’re just setting up your first workbench or optimizing multiplayer raids with friends, this guide covers everything you need to thrive in this rich and ever-evolving world.

What Is Tinkerlands?

Tinkerlands is a cozy yet brutal top-down survival game where you gather, craft, build, and fight your way through an open world full of danger and discovery. Created by Jon Premble and published by HeroCraft PC, the game supports both solo and co-op multiplayer modes. Expect procedurally generated environments, deep resource systems, and tactical combat—all in a charming visual style.

Release Date: July 18, 2024
Platforms: PC (Steam), with potential console versions planned

System Requirements for Tinkerlands

Minimum Requirements

  • OS: Windows 10

  • Processor: Intel Core i3

  • Memory: 4 GB RAM

  • Graphics: Intel HD Graphics

  • Storage: 1 GB available space

Recommended Requirements

  • OS: Windows 10/11

  • Processor: Intel Core i5 or AMD Ryzen 5

  • Memory: 8 GB RAM

  • Graphics: NVIDIA GeForce GTX 960+

  • Storage: SSD recommended

🔧 Note: Tinkerlands is optimized for low-spec PCs, making it accessible to a wide range of gamers.

How to Play Tinkerlands: Gameplay Breakdown

1. Resource Gathering

Start by chopping trees, mining rocks, and collecting food. Resources are color-coded and tiered by biome, with more advanced materials hidden deeper in the world.

2. Crafting & Workbenches

Build crafting stations early. From Workbenches to Forges and Chemistry Tables, crafting unlocks new items and survival gear.

3. Shelter & Base Building

Construct a basic shelter to avoid harsh weather and enemies at night. Reinforce with walls, spikes, and eventually high-tech defenses.

4. Skill Trees & Progression

Tinkerlands uses a modular skill system:

  • Survivor: Improves hunger, health, stamina

  • Engineer: Unlocks tech and advanced tools

  • Scout: Enhances speed and evasion

  • Warrior: Increases combat and weapon mastery

5. Combat System

Combat is fast-paced and strategic:

  • Melee: Swords, clubs, axes

  • Ranged: Bows, bombs, magic weapons

  • Defense: Armor sets, shields, dodge mechanics

Beginner’s Guide: First 60 Minutes

Step-by-Step:

  1. Gather wood, fiber, and food

  2. Craft Stone Axe and Pickaxe

  3. Build a Campfire and Shelter

  4. Unlock Workbench and simple Tools

  5. Explore your Biome for copper, iron

  6. Avoid night roaming unless geared

🔍 Pro Tip: Prioritize crafting a weapon before dark. The wild is unforgiving.

Co-op & Multiplayer Gameplay

Tinkerlands supports online co-op with up to 4 players. You can:

  • Share resources and bases

  • Divide roles (builder, fighter, scout)

  • Tackle bosses and dungeons together

Sync strategies with voice chat or Discord. It’s more fun and far more survivable with teamwork.

Advanced Progression Tips for Hardcore Players

📦 Resource Optimization

  • Always carry a stack of food, torches, and healing

  • Set up multiple outposts for faster mining runs

🛡️ Combat Strategy

  • Use kiting for ranged enemies

  • Stack poison/fire DoTs for elite mobs

  • Craft traps for horde defense

🧪 Tech Advancement

  • Use the Engineer skill tree to automate crafting

  • Unlock drones and turrets to defend outposts

🧱 Biome Scaling

Each biome has:

  • Unique enemies

  • Special resources

  • Hidden dungeons

  • Weather effects

Don’t rush zones—gear and level before venturing far.

Tinkerlands FAQs

What is Tinkerlands about?

Tinkerlands is a sandbox survival RPG focused on crafting, base building, and combat in procedurally generated worlds.

Can you play Tinkerlands co-op?

Yes, Tinkerlands supports up to 4-player online co-op.

Is Tinkerlands hard?

It balances cozy crafting with hardcore survival. Easy to start, difficult to master.

Does Tinkerlands have permadeath?

No, but dying penalizes your resources and progress unless rescued in co-op.

What are the best early-game skills?
  • Scout for mobility

  • Engineer for crafting efficiency

  • Survivor to slow hunger and increase health

Can I play Tinkerlands on a low-end PC?

Yes! It’s optimized for systems with Intel HD Graphics and just 4GB RAM.

Are there bosses in Tinkerlands?

Yes. Each biome features elite monsters and boss arenas.

Final Thoughts

Tinkerlands is more than just another survival crafting game—it’s a rich, tactical, and evolving world where every choice matters. With its robust skill systems, intuitive multiplayer, and constant biome challenges, it rewards both casual explorers and hardcore strategists alike.

Tinkerlands Guide And Walkthrough

Tinkerlands Guide And Walkthrough

Welcome to the ultimate guide to Tinkerlands—a stunning top-down survival sandbox RPG that blends cozy crafting with intense survival strategy. Whether you’re just setting up

READ MORE

Game mods — short for modifications — are community-created add-ons that tweak or enhance video games, adding new content, graphics improvements, quality-of-life features, and more. Mods have transformed titles like Minecraft, The Elder Scrolls V: Skyrim, Stardew Valley, and GTA V into platforms for deeper creativity and gameplay flexibility. However, mods can also introduce serious risks: malware infections, game corruption, save breakage, or even online account bans.

This guide will walk you through the safest and most efficient way to mod your games. From preparing backups to scanning downloads and managing load orders — follow along for a smooth modding experience.

1- Preparation: Backup & Game Version Check

Modding inherently carries risk — from incompatible files to save game corruption. Always backup your game installation and save folders before making changes . On Windows, this often means copying directories like:

C:\Program Files\Steam\steamapps\common\\
%AppData%\\Saves\

Create dated copies such as GameName_Backup_2025-07-14 for easily rolling back.

Mods are often version‑specific. A Skyrim mod for version 1.6 might not work with 1.7+. Games with frequent patches (e.g., Minecraft, Skyrim) may break mod compatibility. Always note which version a mod targets and update carefully.

Stick to Nexus Mods, Steam Workshop, ModDB, CurseForge, or game-specific sites like the Stardew Valley Wiki. Avoid obscure “free mod” websites.

Check for:

  • HTTPS support
  • Author reputation
  • Download count and comments

Community feedback and security experts warn: mods with .exe installers pose significant malware risk. Prefer zip/rar archives containing only data files.

Even from trusted sources — scan every mod using:

  • Windows Defender
  • Malwarebytes
  • VirusTotal (check rare executables).

Reddit users reported real threats:

“Downloaded excite V2 which had a Trojan included… Trojan:Win32/Casdet!”

Minecraft mods have even bundled malware like Fractureiser and BleedingPipe — so scanning is essential

Tools like Vortex, Mod Organizer 2, Stardrop, or SMAPI (for Stardew Valley) simplify installation:

  • One-click installs
  • Conflict detection
  • Easy activation/deactivation
  • Automatic load order optimization

For Stardew Valley:

  1. Install SMAPI.
  2. Use Stardrop to manage .dll mods and their load order PC Gamer.

For Skyrim:

  1. Install Vortex or MO2.
  2. Download mods via “Download with Manager.”
  3. Activate, optimize order, then launch through manager .

If you prefer manual mods:

  1. Extract .zip/.rar correctly — avoid extra subfolders.
  2. Place files in the mod directory:
    • ...\Mods\ (Skyrim)
    • .minecraft\mods\ (Minecraft)
    • <Game>\Mods\ or <Game>\Data\ for other games.
  3. Follow mod author instructions for dependencies (e.g., Script Hook V, OpenIV for GTA V)

Most include tools like LOOT to automatically order mods for compatibility .

Read each mod’s README:

  • Dependencies (e.g., SMAPI for Stardew)
  • Incompatibilities
  • Load suggestions
    Disable other mods one at a time to test conflicts, or stagger activations.
  1. Backup .minecraft folder.
  2. Install Minecraft Forge.
  3. Download mods matching game and Forge versions.
  4. Place .jar/.zip into .minecraft\mods\.
  5. Launch via Forge profile, check via Mods menu.
  1. Backup game and saves.
  2. Install manager and link to game.
  3. Download mods.
  4. Activate and let manager resolve conflicts.
  5. Launch through manager launcher .
  1. Backup AppData/.../Saves.
  2. Install SMAPI.
  3. Drop mods in Mods folder.
  4. Launch via SMAPI or Stardrop.
  1. Backup game folder.
  2. Install Script Hook V, .NET, OpenIV.
  3. Use GTAV Mod Manager for multiple scripts.
  4. Avoid using mods while in GTA Online to prevent bans
  1. Launch game immediately.
  2. Check mod features (menus, items, graphics).
  3. If crashes occur, disable mods in batches to isolate culprits.
  4. Consult mod pages or comment sections (e.g., Nexus, Reddit) for known issues .
  5. Adjust load order or uninstall conflicting mods.
  • Backup before updating mods or the base game.
  • Use manager tools to update or disable outdated mods.
  • Re-test after updates; version changes often require mod reconfiguration.

Simply deactivate/uninstall — most tools clean up leftover files.

Delete mod folders/files. If issues persist, restore from backups.

Avoid uninstalling mid-playthrough; revert to a clean save if needed.

  • Visual mods (textures, UI tweaks) are usually safe to add mid‑session.
  • Structural/content mods (quest packs) can corrupt saves — better to apply before starting.
  • Always save a clean file before testing new mods .
Safety TipWhy It Matters
Download from reputable sourcesAvoid malicious uploads; use official hubs
Scan every downloadMalware-laced mods are real threats
Skip mods with .exe installersHigher risk of admin-level malware
Read comments and reviewsCommunity feedback catches issues fast
Backup firstProtects your game and progress
Use mod manager when possibleSimplifies install and conflict handling
Test mods thoroughlySpot conflicts early before they break game or files
Be cautious with online game modsRisks account bans or detection by anti-cheat systems

Game mods can breathe fresh life into your favorite titles — but they must be handled with care. By following these preparation, installation, testing, and maintenance steps, you’ll have a safe, reliable modding experience that safeguards both your system and gameplay.

Want a printable modding safety checklist, or need build-specific help for Minecraft modpacks or GTA V script mods? Just ask — I’d be happy to help tailor this to your favorite game!

How To Install Game Mods Safely

How to Install Game Mods Safely: A Complete Step‑By‑Step Guide

Game mods — short for modifications — are community-created add-ons that tweak or enhance video games, adding new content, graphics improvements, quality-of-life features, and more.

READ MORE

Looking for the latest Infinity Fighters codes on Roblox? We’ve got you covered! In this battle simulator by Sowel Studio, you collect and train anime warriors from universes like Dragon Ball to fight enemies, bosses, and explore dynamic zones.

To help you unlock free rewards like Gems, Portals, Shards, and Raid Tickets, we’ve compiled all active and expired codes below.

💡 Pro Tip: These codes may expire quickly, so redeem them as soon as possible!

Here’s the updated list of active codes as of July 2025:

CodeReward
SORRYFORTHEDELAY🎁 30 Gems
UPDATE2🎁 Portals + Gems
MINIUPDATE2🎁 3 Raid Tickets
MINIUPDATE1🎁 Portals
sorry4shutdown2🎁 2 Hatcher Shards

📌 Note: These codes are case-sensitive, so enter them exactly as shown.

These codes have expired and no longer work:

  • BLUELOCK
  • SORRYFORSHUTDOWN
  • NOEXPLOITERS
  • Plique
  • sorry4thebugs

It’s quick and easy to redeem codes in the game:

  1. 🔹 Open Roblox and launch Infinity Fighters
  2. 🔹 Look for the Codes button on the left side of the screen
  3. 🔹 Click it to open the code redemption box
  4. 🔹 Type in a working code (copy from the list above)
  5. 🔹 Press Redeem to claim your reward

🎉 That’s it! If the code is valid, you’ll instantly receive the in-game items.

To stay up to date with new Infinity Fighters codes, do the following:

  • ✅ Join the Sowel Studio Roblox Group
  • ✅ Join the Infinity Fighters Discord Server
  • ✅ Follow them on Twitter/X and YouTube
  • ✅ Bookmark this page—we update it regularly!

🔔 Developers usually release codes during game updates, shutdowns, or milestone celebrations.

Infinity Fighters is an anime-inspired Roblox battle simulator that lets you summon, train, and evolve powerful fighters to take on epic bosses and clear challenging zones.

  • Auto Battle Mode – Let your fighters auto-battle while you farm resources
  • Anime Characters – Collect characters inspired by Dragon Ball, One Piece, and more
  • Exploration – Unlock new zones with tougher enemies and better loot
  • Fighter Evolution – Upgrade your team for more power and faster progression
  • Free Items – Use daily codes to get free Potions, Raid Tickets, and Hatcher Shards

Yes! As of July 2025, new codes like SORRYFORTHEDELAY and UPDATE2 are active.

Codes often give Gems, Portals, and Raid Tickets, which are essential for unlocking rare units and progressing quickly.

Check if:

  • You entered the code exactly as shown
  • The code is still active and not expired
  • You’re using the latest version of the game

Usually during:

  • Game updates
  • Bug fixes
  • Server shutdowns
  • Community milestones (likes, visits, etc.)

Play Infinity Fighters now on Roblox:
👉 Play Infinity Fighters on Roblox (insert actual URL)

That’s everything you need to know about the Infinity Fighters Roblox Codes for July 2025. Keep checking this page for fresh updates, new codes, and upcoming content drops.

Infinity-Fighters-Codes-678x381

Infinity Fighters Codes [July 2025] – Free Gems, Portals, Shards & More

Looking for the latest Infinity Fighters codes on Roblox? We’ve got you covered! In this battle simulator by Sowel Studio, you collect and train anime

READ MORE

Summertime Saga is a unique hybrid of visual novel, dating sim, and open-world adventure. Its adult themes are mature and consensual, backed by a passionate community and fresh updates. If you’re above 18 and appreciate branching storylines, character depth, and life-sim mechanics mixed with romance, it’s definitely worth exploring.

Allow 2-Day Pass:

  1. The police officer Harold is reassuring the landlady in the kitchen, and you get to know his partner, Yumi. Suspicion is growing thicker around your father’s death and the debt he incurred.

Allow 2-Day Pass:

  1. The breakfast is ruined by two Russian‐accented thugs at the front door. While Debbie’s making a statement in the kitchen, Jenny has her own opinion in the hallway.

Allow 5 days to Pass:

  1. No sooner have you crossed the home threshold than the intimidation resumes. The housemates aren’t much more confident.

This event is randomly triggered after an 11-day delay.

  • It could have been just another day but Igor and Dimitri decided otherwise. Your rescue is due to Tony’s interposition. After recounting the incident to Debbie and Jenny, you find solace in your bed.
  • Next day, the least you ought to do is thank Tony in his restaurant. A deliveryman’s position just opened up: with the bike purchased at Consum-R, distribute the pizza in the right order to be hired.

From that point on, the mafia ambushes begin. As a consequence, it’s recommended that you regularly transfer the earnings to the bank account.

Succeed 3 pizza deliveries and allow 3 days to pass.

Meet the voluptuous redhead named Tina in the pizzeria. Tony convinces you to shift up a gear. Saga Dealership has what you need, but the receptionist is uncooperative and the salesman despicable. Finally Josephine accepts if you fetch her precious cell phone. 4 points in dexterity let you improvise a diversion in Mr. Sato’s office. Josephine suggests the scooter for $1,100. Trot the motorcycle out to Tony, this is a good start!

Succeed 5 pizza deliveries and allow 4 days to pass.

  1. Next day, Maria introduces you to pizza making and demands 4 handmade dishes.
  2. Next day, Tony confides in you that making a child is not as easy as baking.

Succeed 4 pizza deliveries.

  • Tony insists you buy new wheels. Head to the car retailer where Josephine is having a falling out with her colleague about private pictures. Since you can’t change Kim’s mind, find the mechanic in the garage who asks you to retrieve a tool bag in exchange for the service.

The next two steps are optional if they have already been done.

  1. First buy a swimsuit in the department store at the mall. Try entering the swimming pool stalls until Cassie expels you. Come back in the evening. A brief midnight swim and the ban is lifted!
  2. Next day, return to the public pool and fail to drown yourself so you gain access to the medic room.
  3. Grab the bag inside the fourth stall. At Saga Dealership, Jiang delivers the goods; but can you stay true to your word? That choice affects Mr. Sato’s daughter’s next reward. The small city car is yours for $4,500. Take it to Tony’s Pizza; here we go again for another round of deliveries, this time in a pink toy!

Succeed 8 pizza deliveries and allow 5 days to pass.

  • Tina is at Tony’s Pizza, keeping up to date with the couple’s adoption. There’s a sack of flour waiting for your muscles (and 5 points in strength) in the storage room. The Russians arrive uninvited and are well‐received by Tony, Maria… and her shotgun. The situation is out of control.

Succeed 7 pizza deliveries.

  1. Next day, go to the pizzeria. Deliveries pay off, so put that money into a better engine. Josephine, never short of mischief at the dealership, forces you to swipe a vest in the office. The assistant invents a new game to pass the time together.
  2. Next day, as you enter Saga Dealership, you come across some new Russian faces, including a rather cute one. Buy the sports car with a ridiculous name but an astronomical price, and let Tony admire it.

Succeed 10 pizza deliveries and allow 4 days to pass.

  • Tony tells you that a new order was made. Enter the apartment building, then go to the third floor, room 301. A scantily clad Tina drags you into a sex romp. What a stupefaction for Becca, her daughter! In case you bought the beach house, go to sleep in Debbie’s house instead of the beach house.
  • Next day, in the morning, you have a phone call from Miss Sato. As soon as said, as soon as done; you’re in the showroom looking for the unwise one. You can’t help but notice the strange game between Mayor Rump and Kim, which continues into the garage. Report to Josephine in the office. Work gives way to pleasure, and you end up naked on her father’s desk.
  1. In the afternoon, go to the Italian restaurant. The place’s owner praises your efforts with the latest client.
  2. Next day, in the morning, the pizza guy is willing to share information with a sine qua non condition: make his wife pregnant! Wait for Tony to put a little romance, then enter the storage room in the evening.

Save here for the branching.

  1. With or without her husband’s support, Maria devotes herself unreservedly for the good cause.

Allow 1 week to pass.

  • Tony proclaims the good news by an early morning call: they will have a baby! Join them in the restaurant. With both the address of the Russian hideout and the binoculars from the treehouse now in your possession, you take the initiative and approach the warehouse in the evening. Posted in a bush, you barely recon the dreaded place before a crack breaks the silence and leaves you unconscious.
  • You recover your mind to find that Officers Harold and Yumi caught you. Back home, you go to bed with more questions than answers.
  1. Next day, you brief Tony about the expedition and decide to rummage into your father’s belongings. Debbie states that the box is stored in the attic, only reachable with the garage stool and the small key from the entrance. You puzzle with Tony over a retrieved photo of Dad with the mayor that comes with a small key and a code, both pointing to the local bank.
  2. Next day, at the precinct, Harold explains the department won’t do any move. Enter Saga Financial. The teller brings you up to date on Debbie’s financial situation. After a domestic scene ensues, Liu accompanies you to the vault where you look for the lockbox #11082. You come back to Tony with for only trail that of Mayor Rump’s. Go to Rump estate; while reporters crowd in the front door, you are called by Erik who might know a way to have an insight.
  3. Next day, in the afternoon, meet your buddy near the treehouse. Your joint supervision mainly focuses on the attractive body of the mayor’s daughter. The stalkers fall prey and Iwanka soon gets you. She lets herself be tempted by an informal party. Wait for the evening and go check on Erik who is making the final touches in his basement when Tammy is already welcoming the girl. The atmosphere is hotted up by the ingestion of shots of alcohol and the watching of an adult‐only movie. Iwanka naturally turns to the main character to quench her thirst.
  1. Next day, you may be Iwanka’s personal assistant, but it needs 5 points in charisma to dupe the guard and enter the mansion of the Rump family. Loud protests are arising from the kitchen downstairs where a servant is facing the inappropriate expectations of the not‐so‐great mayor of Summerville. Going from bad to worse in the garden, she is now jostled by the mistress of the place. The poor creature is named Consuela, as the alluring landscape gardener makes the translations. Continue the visit with the master bedroom; the box spring provides a welcome refuge but the inevitable happens; play the act to the end to obtain a staff badge from Melonia Rump.
  2. Next day, have a chat with Iwanka, in her bedroom during the morning. Steal a maid uniform from a kitchen cupboard. Jump back in the bedroom in the evening, ready to exfiltrate the poor little rich girl. You head towards the pier where Captain Terry lends you a frail skiff to join a yacht offshore. Iwanka soon gets at ease on board, driving the main character in her wake. A plan begins to form on how to get evidence on the mayor.
  3. Next day, you are greeted by Melonia, who waste no time in complaining why her hot tub has not been cleaned yet. I guess there is no way out of it, so get cleaning, Ricky can help you with that. Grab the leaf skimmer and take it to Ricky, who now awaits you by the tub.
  4. Next day return to clean the hot tub for Melonia again. You will need to clean the hot tub a few times over the proceeding days as Melonia becomes more interested in your other potential services for her. Ricky will assist you in pleasing Melonia and also negotiate your compensation with her.
  1. Once Melonia agrees to your terms for your further services you can return that evening and ask her for help. Meet her in her room and ask her to assist you in distracting the guard in order to access Rump’s Office.
  2. Once Melonia orders the guard away you can enter Rump’s office. Inside you will explore in order to find evidence of his involvement in your father’s death. Take the evidence to Harold at the police station where he will inform you to leave the matter up to the police.
  3. Next day return to the police station the where Harold and Earl will update you on the investigation and inform you that they will soon arrest Rump.
  1. Go to see Tony at the Pizzeria the next day and inform him of the evidence found in the Rump residence. He will encourage the hero to make the tough journey to the Graveyard to finally visit his Father’s grave.
  2. At Frank’s gravesite the hero relays the events of the Main Story and his daily life up till that point. He will soon be joined by Father Keeves on his lunch break, who will begin a long discussion that ends in retelling the events of the main story so far. Once the hero departs in some frustration, Father Keeves will make a mysterious phone call and accept the job offer of the person on the other end of the line.
  1. After leaving the Graveyard a mysterious black car will pull up beside the hero. A large man will grab him and toss him into the back seat of the car where he will meet Russian Mafia boss Raz’s daughter, Nadya. She will make him an offer that he had better not refuse.
  2. Next day tell Tony about the unexpected meeting with Nadya and her offer. He is skeptical of her offer of assistance but is willing to help the hero to fulfill his end of the bargain.
  1. On Tony’s advice head to the bank and ask Liu about the item stored there that Nadya wants. While talking to her, her husband Kim shows up in a very agitated state and rudely drags her into the back of the bank to demand she get ready to leave Summerville in a hurry.
  2. Witness Kim being abusive towards Liu and step in to stop him. After a brief confrontation, Kim retreats and the hero helps a disheveled but grateful Liu back to her feet. After informing her that he is seeking justice for her close friend, his dead father, she gladly agrees to help. She asks the hero to her apartment that evening to search for evidence of Kim’s collusion with Rump and Raz.
  1. oin Liu at the Seaside Apartments that evening and after discussing how important Frank was to her Liu lets the hero search the place. After a thorough search he notices something odd about Kim’s statue and finds ample evidence there of Kim’s part in the conspiracy with Rump and Raz.
  2. Liu is very excited to finally be free of Kim and especially grateful to the hero for his part in it. In the middle of showing him just how grateful she really is Kim returns and confronts them. After a rather pathetic attempt at violence with the hero, both he and Liu humiliate Kim who beats a hasty retreat. Liu agrees to help retrieve the item from the bank that Nadya wants and will meet him at the Pizzeria the next day to discuss the details.
  3. After dropping off the new evidence at the Police station it’s time for bed. Harold assigns Yumi to keep her cruiser in Debbie’s driveway to discourage anyone from harassing the family.
  1. Next day Liu is at the Pizzeria where Tony is plying her with pizza rolls. She informs them of the security measures at the bank and suggests Tuesday mornings are the best time to pull off the heist. Tony informs the hero they need a bag of equipment vital to the operation that’s in his apartment where Maria is at home resting because she has a cold.
  2. A sick Maria is surprised by the visit but agrees to allow the hero to enter the bedroom to retrieve Tony’s duffel bag. As he leaves he sees a sick but still gorgeous Maria asleep on the couch.
  1. Tuesday morning meet Tony outside the bank where he opens the duffel bag of “equipment”, including some very interesting facemasks.
  2. After a dramatic entrance of the bank it’s noticed it was unnecessary as the place is empty except for Liu and the sleeping security guard. After some play-acting for the security cameras, Liu is “forced” to take the hero to the vault as Tony secures the still sleeping security guard.
  3. Once Tony joins them they “force” Liu to open the vault. Once inside there are no more security cameras so everyone can relax. Retrieve the briefcase that contains the item Nadya wants and examine the contents. After everyone seems amazed by the mysterious item Tony says it’s time to go and leaves the hero alone with Liu. After turning down Liu’s offer to visit her that night as being unwise under the circumstances he ties her up and departs with Tony.
  4. Safely back at the Pizzeria with the item secured call Nadya to arrange the handoff with her. She tells the hero to meet her at Raven Hill the next evening.

Save here. After this point, you will be locked into finishing the main story through step 64 before you can continue with other story lines. Make sure your strength and dexterity are at 10 before continuing.

  1. Next day in the evening at Raven Hill see Nayda’s man Jab standing outside of her black sedan. After a few awkward words with the man that has been shaking him down for money for the last few weeks, Nadya orders Jab to let the hero in the car. Once inside give Nadya the briefcase and after she happily examines the contents she tells the hero that she will need a few days to get her father’s men on her side. Once she has she will inform him and they can then take down Raz together.
  2. After leaving Nadya call Tony to update him and return home for the evening.
  1. Outside the Home the door to the house and the police cruiser are ajar. Hurrying inside, the hero finds a semi-unconscious Officer Yumi at the foot of the stairs with a bullet wound in her upper arm. She confirms his worse fears, the Russians attacked the house and have abducted Debbie and Jenny. Harold shows up and while providing aid to Yumi tries to stop the hero from leaving but to no avail.
  2. Outside the house call Tony and inform him of what has happened. He convinces the hero not to head directly to the Warehouse but instead to meet him at the Pizzeria.
  3. At the Pizzeria Maria is waiting with Tony who has his trusty pipe ready for a rough evening. Call Nadya, who is already aware of the abduction but who is reluctant to move up the operation as she has had no time to turn her father’s men to her side yet. After making it known he won’t wait to rescue Debbie and Jenny Nadya reluctantly agrees to help.
  4. Harold then shows up and despite Tony’s skepticism of his intentions, removes his uniform and badge and agrees to help them.
  5. The trio finds Nadya waiting for them outside the Warehouse surprisingly with a black suit wear Father Keeves. It is here that to their surprise and Tony’s admiration they learn that Father Keeves isn’t exactly who he claimed to be. Tony and Harold go to take their places outside the Warehouse and Father Keeves also takes his position. Nadya gives the MC some parting encouragement, and then he enters the “point of no return.”
  1. After a harrowing journey through a sewer pipe and up a ladder the hero finds Jab waiting for him in the Warehouse. He hands over a towel to clean up with but refuses to offer any further help at this point. Enter the next room alone via a garage door to discover another door waiting. Past that door, he sees Raz, Nadya, and Dimitri standing over Debbie and Jenny and demanding they return the briefcase. Raz and Nadya retreat upstairs to the office as Dimitri drags the girls into another back room for further “encouragement”.Emerging from the tunnel
  2. Now seeing the main Warehouse space full of Raz’s goons, return to the previous room and look for something to help clear them out of the way. An interesting weapon is an obvious choice and he reemerges to confront them with it. After their initial shock, they are assumed as his weapon is aimed in the wrong direction. Not realizing this the hero fires it, the concussion knocking everyone to the floor. The now angry goons approach for retribution only to begin dropping like flies. Father Keeves, from a window on the roof, uses his rifle to make short work of the goons. At this point Harold and Tony storm in and finish off the rest of the goons at close quarters.
  3. After confirming the goons were handled and that Father Keeves has disappeared, Harold searches further into the Warehouse as Tony makes sure the hero is fine. They eventually follow the now non-responsive Harold to discover many scantily clad ladies making illegal substances.
  4. After “liberating” the very happy naked ladies they meet Svetlana, who informs them that Dimitri took the girls further in.
  5. Entering the next door they see Dimitri hovering over Debbie and Jenny with a knife, threatening to harm them if they don’t tell him where the briefcase is. After confronting Dimitri he taunts them to distract them from seeing Igor in the shadows. After Igor shoots Tony in the arm and Harold subdues him the hero is alone to confront Dimitri. Dexterity will need to be at 10 to complete the minigame.
  1. After defeating Dimitri and freeing the girls you head upstairs to confront Raz much to Jenny’s dismay. After entering the room you see Nadya is also there. Raz complains about your father’s unfortunate conscience to distract you as he retrieves his gun. Aiming it towards the hero it is kicked out of his hands and the hero and Raz both struggle on the floor for it. Strength will need to be at 10 to complete the minigame.
  2. With the gun now safely in the hero’s hands, Raz says to him he’s weak like Frank and doesn’t have it in him to kill him. When the hero insists that Raz must live to face punishment Nadya kills her own father, insisting he is too dangerous to live. After offering to reward him for his help the hero says it’s probably a good idea for Nadya to depart before the police show up, but she promises to reward him later.
  1. Returning back downstairs the police have shown up and there’s no trace of Nadya, the scantily clad ladies, or Father Keeves. Harold promises to smooth things over and Tony escorts the group back Home.
  2. Next day the hero wakes up and reflects on events. Yumi shows up to provide them with an update and Debbie insists the still injured police officer come in for breakfast. The hero bemoans the fact that Debbie’s house is still heavily mortgaged and wonders what his father did with the money he embezzled from Raz. Liu calls to tell him she misses him and asks him to visit her that evening.
  3. After visiting Liu that evening the hero goes to leave but notices the painting his father gave Liu. A note to her from Frank drops out of it. At the conclusion of the letter, he asks her to tell the hero a message from him. That his legacy lies with the Dink.
  1. The next day visit the Treehouse to take a look at the good old Dink. After scaring away the seagulls to take the tarp off the boat Erik appears and is cross with you. Apparently, he really does watch birds. After telling him about Frank’s letter both overlook the Dink and are surprised to find a bag full of the embezzled money and another emotional letter to the hero from his father. He asks him to take care of Debbie, Jenny, and Liu with the money.
  2. Head straight to the bank to give Liu the great news. Pay off Debbie’s mortgage and give Liu half of what is left for her to start a new life as Frank wanted. With the other half of the money left, the hero’s college tuition has been secured.
  3. Head home to give Debbie the wonderful news.
  1. Sleep at home and be awoken several days later by a knock on the door. To your surprise and Debbie’s horror Jab is there. Very apologetically he tells them Nadya sent him to invite the hero to the Warehouse, which she acquired by auction, where she has started a legitimate business producing Vodka. After giving them a bottle he departs.
  2. Despite Debbie’s severe misgivings visit the Warehouse to meet Nadya. There Svetlana greets the hero. She is now Nadya’s bodyguard. She will take him to the office to talk to Nadya. At the doorway they meet a naked Katya, who now serves as Nadya’s “business adviser”.
  3. Inside, a very satisfied-looking Nadya will offer the hero a job, which he can take his time deciding on accepting. She also offers to finish what they started the other night and have him help her start the next generation of her “family” business.

Summertime-Saga-Logo

Summertime Saga Complete Main Story Walkthrough

Summertime Saga is a unique hybrid of visual novel, dating sim, and open-world adventure. Its adult themes are mature and consensual, backed by a passionate

READ MORE

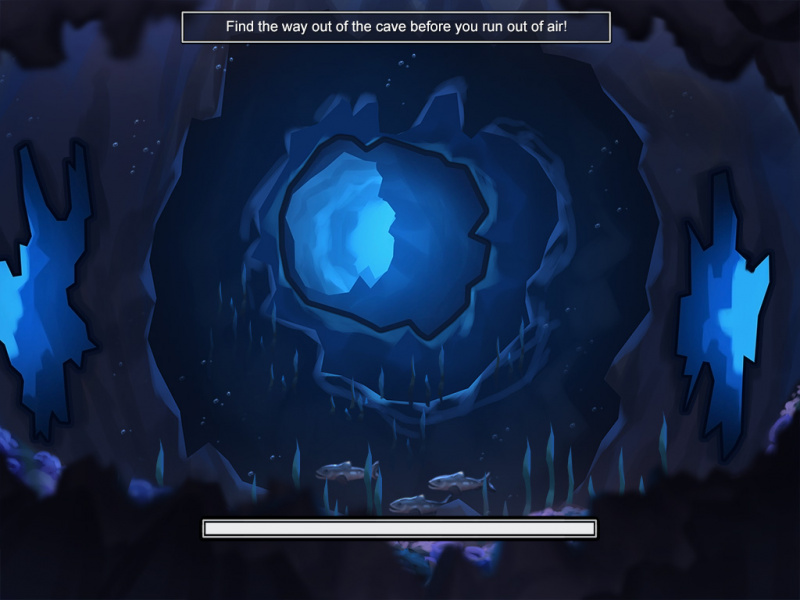
In Aqua’s storyline, you’ll dive into an underwater maze challenge where your goal is to help the main character reach the exit and uncover the mysterious creature’s lair.

As you navigate the submerged labyrinth, you’ll encounter tunnel intersections where you must choose one of three openings:

  • Left
  • Center
  • Right

A timer (indicated by a white air bar) limits how long you can spend making each choice. If the bar depletes, the character runs out of air, and the minigame fails.

Aqua Maze Minigame Walkthrough

To successfully reach the lair, follow the path revealed on the globe located in the home attic. The directions (read from bottom to top) are:

  1. Center opening
  2. Center opening
  3. Left opening
  4. Left opening
  5. Center opening
  6. Right opening
  7. Center opening

This sequence leads you directly to Aqua’s hidden lair, where another minigame awaits.

Aqua_Maze_minigame

Aqua Maze Minigame Walkthrough

In Aqua’s storyline, you’ll dive into an underwater maze challenge where your goal is to help the main character reach the exit and uncover the

READ MORE

Fire Force Online is back—rebranded and reignited under the new title: Fire Force Reignition. While the core gameplay remains the same, this relaunch brings renewed energy and fresh community tools that you won’t want to miss.

Whether you’re a newcomer or a seasoned player, this guide will connect you to the official Trello board and Discord server, helping you unlock the full potential of Fire Force Reignition.

The Fire Force Reignition Trello is a player resource designed to guide you through the game. Managed by the developers, this Trello board provides structured, easy-to-navigate information about the game’s core systems, including:

  • 🔥 Faction Progression
  • 🧍 NPCs
  • 🩸 Clans
  • 🌀 Abilities
  • 👹 Bosses
  • ⚙️ Augments
  • Blessings
  • …and more!

This board is especially helpful if you’re just starting out or stuck on a particular aspect of the game.

Trello is widely used in the Roblox dev community for its simple layout and collaborative tools. Here’s how to navigate it:

  • Browse by Sections: Trello cards are categorized into lists like “Factions,” “Abilities,” etc. Scroll through to find what you need.
  • Use Search Shortcuts: Press F on your keyboard to search for keywords within the board.
  • Explore Details: Click individual cards to view deeper insights, tips, or guides about specific topics.

📌 Bookmark the Trello board for easy access when you need a quick reference mid-game.

The Fire Force Reignition Discord server is the heart of the community. Built by the official developers, it provides players with:

  • 🗞️ Real-time announcements
  • 🛠️ Patch notes and updates
  • 👀 Sneak peeks at new content
  • 💬 Community chats and help channels
  • 🎁 Giveaways for in-game rewards

Once you join the server, here’s where to go:

  • #announcements, #updates, and #sneaks: Stay informed about game patches, events, and new content.
  • #general and #questions: Chat with the community or get help with tricky quests or features.
  • #giveaways: Participate in events to win in-game items and exclusive rewards.

💡 Don’t forget to read the rules and verify your account to gain full access to the server.

The Trello board and Discord server are two of the best tools to help you navigate Fire Force Reignition. Whether you’re trying to optimize your build, master your faction, or just keep up with the latest changes, these platforms will give you the knowledge and support you need.

Be sure to join the official Discord and bookmark the Trello—you’ll thank yourself later when you’re dominating the battlefield with confidence!

Fire-Force-Reignition-Trello-Cover-678x381

Official Fire Force Reignition Trello Link & Discord Server (2025 Guide)

Fire Force Online is back—rebranded and reignited under the new title: Fire Force Reignition. While the core gameplay remains the same, this relaunch brings renewed

READ MORE

Looking to boost your progress in Universal Piece? We’ve got you covered! Below is the full list of active Universal Piece codes you can redeem for free Gems, Yen, and other in-game rewards. Use them to unlock powerful Fruits, travel faster, and buy useful gear.

Pro Tip: These codes are time-sensitive, so redeem them as soon as possible!

Use the following codes exactly as shown. They are case-sensitive, so copy and paste for best results.

  • UPD0.75 – Redeem for 700 Gems (New)
  • Sorryfordelay – Redeem for 5,000 Gems (New)
  • UPDATE0.5 – Redeem for 8,000 Gems (New)
  • SORRYFROMPIKACHU – Redeem for 5,000 Gems (New)
  • RE-RELEASE! – Redeem for 700 Gems and 15,000 Yen (New)
  • Sorryforanything – Redeem for 15,000 Gems
  • SorryForBugGamepass. – Redeem for bonus rewards
  • ILOVEYOU – Redeem for free rewards
  • SorryForShutdown – Redeem for 200 Gems
  • RELEASE! – Redeem for 50 Gems and 15,000 Yen
  • BiBoss – Redeem for 50 Gems and 15,000 Yen
  • Zeroian – Redeem for 50 Gems and 15,000 Yen
  • Pikachu – Redeem for 50 Gems and 15,000 Yen
  • Butterbear – Redeem for 50 Gems and 15,000 Yen
  • 3llzr – Redeem for 25 Gems and 15,000 Yen
  • fozesalishane – Redeem for 25 Gems and 15,000 Yen

Good news! There are no expired Universal Piece codes at the moment. Every code listed above is currently working. 🎉

Not sure how to redeem the codes in-game? Just follow these easy steps:

  1. Click the Menu icon located below your profile picture.
  2. Tap on the Settings tab (the gear/cog icon).
  3. Scroll down until you find the Code section.
  4. Paste your code into the box.
  5. Hit the Redeem button to claim your free rewards!

💡 Make sure your code has no extra spaces or typos.

These codes mainly reward you with Gems and Yen, two essential currencies in the game. Here’s what you can do with them:

  • 🍍 Buy Fruits for unique powers
  • 🗡️ Purchase weapons and special items
  • 🚤 Unlock Fast Travel to other islands
  • 🎣 Get gear like the Fishing Rod to earn EXP and more Gems

Whether you’re just starting or already a veteran in the game, redeeming these codes regularly will help you level up faster and explore more of the anime-inspired world.

Universal Piece Codes (July 2025)

Universal Piece Codes (July 2025) – Free Gems & Yen

Looking to boost your progress in Universal Piece? We’ve got you covered! Below is the full list of active Universal Piece codes you can redeem

READ MORE